Confirmed Opt In
Overview
SuiteCRM 7.10 introduces a new Confirmed Opt In feature which provides two opt in settings for email addresses: Opt In and Confirmed Opt In.
-
Opt In is used to indicate that a Contact, Lead or Target has opted in to receive marketing communications.
-
Confirmed Opt In further requires users to confirm their opt in status by clicking a link sent to them via email. This email can be configured to send automatically (e.g. on submission of a Web-To-Person form) or manually, and the template used to send this email can be customised.
Once Opt In or Confirmed Opt In settings have been selected:
-
An additional Opt In checkbox will be visible in Detail and Edit views for email address fields in Contacts, Leads and Targets.
-
Opt In, Confirmed Opt In and Pending Confirmed Opt In status will be visible in List view for records in these modules.
-
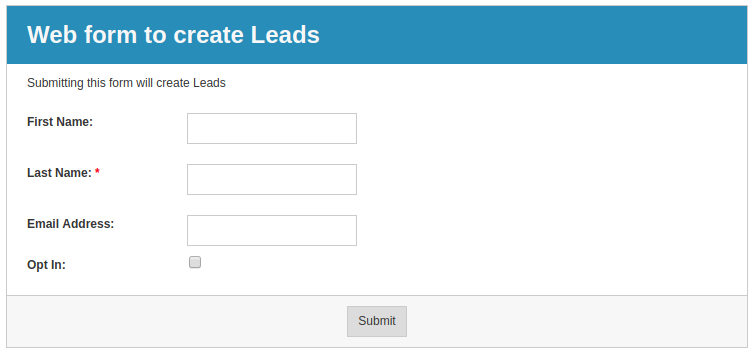
Web-To-Person Forms will automatically include an Opt In checkbox.
-
Campaign emails will NOT be sent to email addresses which are not marked as Opt In or Confirmed Opt In, depending on which settings you choose here.
Opt In Email Settings
To configure your Opt In settings, open the Admin panel and select Email Settings. Opt In settings can be found on the Email Options panel.

Opt In
Select Opt In from the Opt In Settings: menu.

There is no need to configure the other Opt In settings, as Opt In emails are not sent with this setting.
Click SAVE
Confirmed Opt In
Select Confirmed Opt In from the Opt In Settings: menu.

With this setting, users are required to further confirm their opt in by clicking a link sent to them via email.
Select Automatic Opt In Email to have this email sent automatically (e.g. on submission on a Web-To-Lead form). The default template for these emails is the Confirmed Opt In template. You can edit this template from the Email Templates module, but note that it must contain the Opt In link.
Click SAVE
Email Opt In Indication
List and Detail View
Once Opt In or Confirmed Opt In is set, the status of a Contact, Lead or Target email address is indicated in both List view and Detail view with a tick or double tick.

|
Email addresses which have been opted in are indicated by a single green tick. |
|
Email addresses which have had their opt in status confirmed are indicated by a double green tick |
|
Email addresses which are pending an email confirmation are indicated with a single grey tick. |
Edit View
An Opted In checkbox indicates the opt in status in Edit view.

Note that for Confirmed Opt In, manually checking the Opted In box here will result in a status of Pending Confirmation, rather than Confirmed Opt In. The user will still be required to confirm their opt in via email.
Sending/Resending Opt In Emails Manually
If you have Confirmed Opt In configured, confirmation emails can be sent/resent manually, either in bulk or individually.
To send in bulk, select the records to send to by checking the boxes to the left of the records in List view.

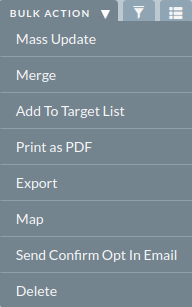
Select Send Confirm Opt In Email from the Bulk Action menu.

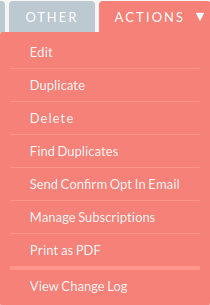
To send to an individual, open the contact record and select Send Confirm Opt In Email from the Actions menu.

Email(s) will be sent silently (without confirmation) using the predefined template.
Campaigns
Your opt in settings will affect your target lists for Campaigns. Campaign emails will NOT be sent to email addresses unless they are Opted In or Confirmed Opted In, depending on which settings you have chosen.
Web To Person Form Opt In
When creating a Web To Person form, an Opt In checkbox will be automatically added after the email address field if Opt In or Confirmed Opt In is configured.

If the user checks this box, the email address will be set as Opted In (or Pending Confirmation if you have Confirmed Opt In configured) when the record is created in SuiteCRM.
Note that if you have Confirmed Opt In configured and Automatic Opt In Email selected, the Opt In email will be sent automatically following submission of the form. If Automatic Opt In Email is not selected, these emails will need to be sent manually.


