User Interface
Before we progress to understanding the structure and functionality of SuiteCRM, we will cover the areas of the User Interface so that you are familiar with terminology used when describing navigating SuiteCRM. There are many elements to the User Interface, so we have broken these down into various sections below.
Navigation Elements
The ability to easily view and navigate to areas of the CRM is key to improved productivity and user adoption. SuiteCRM has a clear UI which has various elements we will cover in this section.
Top navigation menu
The top navigation menu is the main menu users will use to navigate to modules to create and manage records. The standard layout for the top navigation is a list of 10 modules. The ordering for this menu is determined by the order of the modules in Admin → Display Modules and Subpanels. The top navigation menu has six elements. These are:
-
CRM Name – This is the name for the CRM which is specified on installation. This defaults to SuiteCRM.
-
Module Menu – This lists or groups the modules, dependent on the user preference. This provides the ability for users to navigate to modules within the CRM.
-
Desktop Notification Count – This shows the number of desktop notifications the user has not yet read. These can be managed by the user. For full details on Desktop Notifications, see the Desktop Notifications section within this user guide.
-
Quick Create – Quick create allows the quick creation of key module records globally within the CRM.
-
Global/Full Text Search – Allows users to search the CRM globally for records/data.
-
User menu – This displays the user name for the user currently logged in. There is a drop down menu which gives users access to Employees, their profile, the about page and a link to logout.

To view a module, you can click on the module name. This will take you to the List View of that module. For full details on views, read the Views section of this user guide.
Hovering over a module name will produce a drop down menu. This drop down menu displays the Actions and Recently Viewed records for that module.

You can edit records displayed in the Recently Viewed section of the drop down menu by clicking the pencil icon. This will direct you to the Edit View for that record.

There is also a grouped tab navigation structure for SuiteCRM. Users can set this option in their user preferences. For full details on modifying user preferences, see the Managing User Accounts section of this user guide.

The grouped tab navigation menu gives the user the ability to group modules within a tab such as the Sales Tab.

Quick Create
You can click the 'create' icon in the top navigation menu to access the Quick Create options. This is a list of commonly used modules with the ability to create new records within these modules from any location.

Sidebar
The sidebar is part of the responsive theme and is a user configurable option. The sidebar can be expanded and collapsed by clicking on the button highlighted below.

Actions
This displays the Actions for the module you are currently viewing. For example, if you are viewing the Accounts module, the actions that display are: Create Account, View Accounts, Import Accounts. This provides you with one-click access to module actions.
Recently Viewed
This section displays the last 10 records you have viewed. This leaves a breadcrumbs trail so that previously viewed records can be quickly and easily accessed via the sidebar. There is also the option to click the pencil icon, which will take you directly to the Edit View of the record.
Home Page
The home page is the first page that is displayed to you post-authentication. The home page has various elements that can be used and configured such as Dashlets, Dashboards and the Sidebar.
Dashlets
Dashlets are user-configurable sections displayed on the home page that give you a quick overview of your records and activity immediately after login. This is particularly useful for sales and support led teams as this reduces the number of clicks required to view/modify data.
Dashlets can be dragged/dropped within the home page. You can add dashlets by clicking the 'Add Dashlets' link on the home page.

Clicking on the 'Add Dashlets' link on the home page will open up the Add Dashlets popup which allows users to select from a multitude of out of the box dashlets.

To add one of the dashlets, simply click on the dashlet link. This will add the dashlet to the user home page. The popup will remain if you add a dashlet, to allow users to add multiple dashlets. Once you have added your required dashlets, you can close the popup.

You can modify dashlets by clicking the pencil icon on the desired dashlet.

Clicking the pencil icon will display a popup. This popup will contain all of the options that are configurable for the dashlet.

Once you have made the required changes in the dashlet configuration popup, you can click Save to apply the changes, or Cancel if you wish to revert to the current configuration.
Some dashlets require the home page to be reloaded. For dashlets that require this, you will be notified.
Dashboards
Dashboards are new in SuiteCRM. These are configurable per user and can be added/removed similar to dashlets. To add a dashboard tab, you can click the 'Add Tab' link on the homepage.

Clicking on the 'Add Tab' link on the home page will open up the Add Tab popup which allows users to specify a name for the tab and also how many dashlet columns are required. You can opt for one, two or three columns.

Once you have specified the details for the dashboard tab, you can click Save. You can also click Cancel to undo any changes. Once you have saved your changes, the Dashboard Tab will be added and will display on the tab list on user Homepage. You can then add Dashlets to your new dashboard tab.

If you wish to delete the dashboard tab, you can click the 'x' icon. This will prompt you to confirm the deletion and then subsequently remove the dashboard tab from your profile only.
Suite Dashboard is the standard dashboard tab which cannot be removed. You can however configure the dashlets that display on that dashboard tab.
Activity Stream
The Activity Stream is an excellent way of keeping track of your colleague’s interactions with SuiteCRM. By default the Activity Stream displays recent updates for the Opportunities, Contacts, Leads and Cases modules. Your organisation’s Facebook and Twitter feeds can also be included in your Activity Steam dashlets if desired and this can be configurable by an Admin user.

You can also comment about an update within the Activity Stream by clicking on the Reply button on the right side of the post.

Your posts can also be deleted from the Activity Stream by clicking on the Delete button.

Your comment will appear under the original post and will also be timestamped.
The Activity Stream is also a useful tool for internal messaging within your organisation, it is possible to send a message that will be broadcast to all users in your network. To do this type your message in the text field and click Post

Your colleagues will see this message and will be able to respond by clicking on the Reply button on the right side of the post.

Their response will appear under your post, again with a timestamp.

Search
Searching is a vital aspect within the CRM as this allows you to quickly define what it is you want to see. Many CRM’s will have large data sets so it is vital to you that you have a way to refine your search. In the following sub-sections we will cover the various searching options available to you.
Global Search
You can search all records within the CRM using the global search functionality. You can search for records via global search by using the search bar in the main navigation menu.

Once you have entered your search term, you can press the return key or click the magnifying glass/search icon. This will return records that match the search criteria and categorise them by the modules available.

Modules can be added to the global search functionality by the System Administrator.
Full Text Search
SuiteCRM has an option to enable or disable a full text global search. The full text global search is powered by Zend Lucene search framework. The search works very similar to the standard global search, but provides the enhanced functionality of searching text in documents and other files, compared to the record-level search provided by the standard global search.
System Administrators can enable/disable the full text search by clicking on the AOD Settings link within the admin panel.

This will display the AOD option to enable/disable the full text search.

The search returns results slightly different to global search. Results are returned in order of score. Records are scored dependent on how well you match the search criteria provided by you – from 0-100%.

Basic Module Search
Basic search is available on all modules within the CRM. Basic search, as standard, allows users to search on the record name.


Basic search also allows users to check the 'My Items' check box. Enabling this option will only return records that are assigned to you.

Once a user has searched for a record, the search will be saved. This means that you can navigate to records and other modules within the CRM but the search will not be cleared. If you wish to clear your search, you can click Clear and then click Search. This will clear any saved searches and return to the default result set for that module.
System Administrators can modify which fields are searchable in Basic Search within Studio.
Advanced Module Search
Advanced Search is available on all modules within the CRM. Advanced Search provides you with a more detailed module search functionality. As standard, there are more fields available to you via Advanced Search.

Advanced Searches may have many fields and specific criteria. For this reason, You can save your advanced search criteria to easily populate this in future.

To load a saved search, you can select the saved search from the 'My Filters' drop down. This will return results that match the criteria specified in the saved search.

System Administrators can modify which fields are searchable in Advanced Search within Studio.
Views
Within the CRM you will be presented with various views. These views are structured to present you with key information through the record management process. There are three main views:
-
List View
-
Detail View
-
Edit View
All of these views have specific purposes and these are described in the sub-sections below.
List View
This is the view that you are presented with when you navigate to your desired module.

The List View compromises of many actions that you can carry out to manage records. These are:
-
Search Records – provides you with the ability to perform basic and advanced searches, as covered previously in the Search section of this chapter.
-
Sort Records – clicking on the column name will sort the record list by that column either ascending or descending, if sorting is enabled.
-
View Records – clicking on any hyperlinked data will take you to the Detail View of the record.
-
Edit Records – clicking the pencil icon will navigate you to the Edit View for that record.
-
Delete Records – you can select records and then select the delete option to delete records from the module.
-
Mass Update Records – you can select records and then select the mass update option to update data on all selected records.
-
Merge Records – you can select records and select the merge option. This will begin the merge records processes. You can select a primary record and then can merge the data from the duplicate records into the primary record. Once saved, the duplicate records will be deleted and all data/history merged to the primary record.
Detail View
This is the view that you are presented with when you view a record.

The Detail View compromises of many actions that you can use to view/manage your data. These are specific to the Detail View of the module that you are viewing. There are standard actions on the Detail View for most modules. These are:
-
Edit – allows you to edit the record you are viewing.
-
Duplicate – allows you to duplicate the record the are viewing.
-
Delete – allows you to delete the record you are viewing. If a record is deleted, you will be redirected to the List View.
-
Find Duplicates – allows you to begin the find duplicates process where you can use system functionality to find duplicate records.
-
View Change Log – allows you to view changes to audited fields.
Note: To set fields as audited and for any changes to find duplicates, contact your System Administrator.
Hyperlinked fields can be clicked on. This will navigate you to that record.
The Detail View is tabbed in SuiteCRM. This means there is minimal scrolling and data is categorised for each module in the appropriate tab.
System Administrators can select to display data in either tabs or panels. You can contact your system administrator for more information on managing layouts and views.
Edit View
This is the view that you are presented with when you edit a record.

The Edit View allows you to modify record information that is displayed on the view. This allows users to update existing data and also add/remove data. Once you have made changes on the Edit View, you can click 'Save' to apply to changes or click Cancel. Clicking either options will redirect you to the Detail View of the record you are editing. You can click the View Change Log button. This allows users to view changes to audited fields which can be useful before making your intended changes.
Record Management
We have covered the several views that you are presented with so we will now move onto record management. In this section we will cover all areas of record management so that you can efficiently store and manage customer data.
Creating Records
You can create records within modules from various different areas of your Interface. Detailed below are screen shots of record creation points.


Once you click the create button, you will be taken to the creation screen. This is essentially the Edit View that we have covered previously in the this section. This allows you to fill in the appropriate data for that record. Fields with the red star(*) are required fields. Validation is performed so that a record cannot be saved within the CRM unless data is valid for required fields.

Once you have populated all data for the record, you can save the record which will create the record within the module in the CRM. Once saved, you will be redirected to the Detail View of the record you have created.
Editing Records
You can edit records within modules from various different areas of your Interface. Detailed below are screen shots of record editing points.


Once you click the edit button(or pencil), you will be taken to the Edit View. This allows you to edit/populate the appropriate data for that record. Fields with the red star(*) are required fields. Validation is performed so that a record cannot be saved within the CRM unless data is valid for required fields.
Once you have edited/populated the record data, you can save the record which will update the existing record with the new data populated when editing. Once saved, you will be redirected to the Detail View of the record you have edited.
Deleting Records
You can delete records within modules from both the List View and Detail View. Detailed below are screen shots of record editing points:
Detail View Deletion method
Deleting records from the Detail View is a simple process. You simply have to click the 'Delete' button.

When you click the delete button on a record, you will receive a popup which will ask you to confirm that you want to delete the record.

You can either click Cancel or OK. Clicking Cancel will revert you back to the Detail View of the record and will not delete it. Clicking OK will action the record deletion. If you choose to delete the record, the record will be deleted and you will be redirected to the module List View.
List View Deletion method
To delete records from the List View, you can select records using the checkbox option on the left hand side of the view. It is possible to select single records or use the 'Select this Page' or 'Select All' options, to select all records from the page or all records within the module.

Once the records are selected to delete, you can click the 'Delete' button. When you click the delete button on a record, you will receive a popup which will display the number of records being deleted and ask you to confirm that you want to delete the record.

You can either click Cancel or OK. Clicking Cancel will revert you back to the Detail View of the record and will not delete it. Clicking OK will action the record deletion. If you choose to delete the record, the record will be deleted and you will be redirected to the module List View.
Mass Updating Records
You can mass update records from the List View of any module, given this option is made available to you. To mass update records, you have to check the records in the List View and then select the 'Mass Update' option from the dropdown menu (next to the delete link).

Clicking the mass update option will display a screen at the bottom of the List View. This will list all fields that can be mass updated by you.

Once you have populated the fields you wish to mass update, you can either click Update or Cancel. Cancelling the mass update will cancel any changes and redirect you to the List View of the module. Clicking update will update all selected records with the changes specified in the Mass Updating Records section.

Merging Records
You can merge records from the List View of any module, given this option is made available to you, or via the Detail View if you follow the 'Find Duplicates' process.
To merge records, you have to check the records in the List View and then select the 'Merge' option from the dropdown menu (next to the delete link).

Once you have clicked on the 'Merge' option, you will be presented with a merge screen. This will show the primary record and the duplicates that you wish to merge with that primary record.
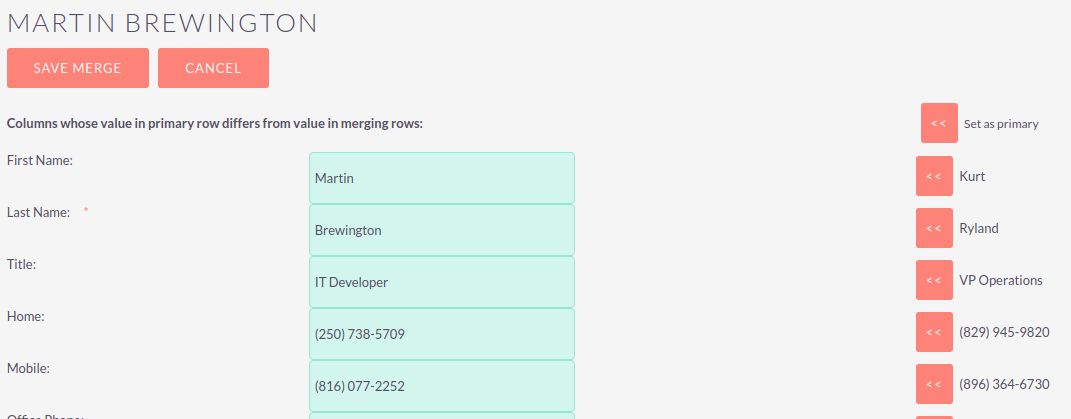
You can select which record is primary using the 'Set as primary' button on the right of the merge view. You can move data from the duplicate records to the primary record using the '<<' buttons. In this example, we have moved the First Name and Last Name from the duplicate record to the primary record.

Once you have made the required changes on the merge screen, you can click Save Merge or Cancel. Clicking cancel will discard the merge changes and will revert you to the List View for that module. Clicking 'Save Merge' will continue the Merge process and will prompt you to inform you that the duplicate record will be deleted.

You can click 'OK' or 'Cancel'. Clicking Cancel will discard the merge changes and will revert you to the List View for that module. Clicking 'OK' will save the merge and will redirect you to the Detail View for the merged record.

As can be seen from the example, the merge has completed successfully. The First Name and Last Name have been updated, and all other data has been retained.
Importing Records
It is possible to import data easily by using SuiteCRM’s easy-to-use User Import Wizard. There are many hints and tips as you progress through the Import Wizard on the requirements of importing data and for further steps in the Wizard.
User Import Wizard features
There are many features of the Import Wizard which make it easier for you to map data to CRM fields and also for future imports. These are:
-
Sample .csv file for easier import of data — Use the available sample .csv file as a template for import of files
-
Retain settings from previous imports — Save/preserve import file properties, mappings, and duplicate check indexes from previous imports for ease of current data import process
-
Ability to accept both database name and display labels of drop-down and multi-select field items — Field labels as well as database names are accepted and mapped during import, but only the field labels are displayed for ease of use
-
Ability to accept both usernames and full names in user fields during import and export of data — Full names of Users displayed for Assigned To and other User-related fields in exported .csv file for easier identification of user records
-
Ability to auto-detect file properties in import file — Upload import files without specifying file properties such as tab, comma, double and single quotes, date and time formats, making the process simpler and faster
-
Ability to import contacts from external sources such as Google — Ability to import Google Contacts for person-type modules such as Contacts, Leads, and Targets, relate SuiteCRM records to Google Contacts, and communicate with Google Contacts from within SuiteCRM
Steps to Import data
Always import the Account data first and then import Contacts and other data related to Accounts (such as Meetings, Calls, Notes) to automatically create a relationship between the imported Account and Contacts and activity records related to the Account.
Follow the steps listed below to import data for a module, such as Accounts:
-
Select Import from the Actions drop-down list in the module menu options.
-
This displays Step 1 of the import process with a link to a sample Import File Template.
-
Upload your import file to this page using the Browse button in the Select File field or,
-
Optionally, download the available template, delete the existing data, input your data and upload to this page using the Browse button.
-
Click Next.
-
This displays Step 2 (Confirm Import File Properties).
-
Auto-detection of imported data takes place at this step.
-
Click View Import File Properties button to verify and change the data as needed, if you notice irregularities in the Confirm Import File Properties table.
-
Click the Hide Import File Properties to collapse the panel.
-
Click Next.
-
This displays Step 3: Confirm Field Mappings.
-
The table in this page displays all the fields in the module that can be mapped to the data in the import file. If the file contains a header row, the columns in the file map to matching fields.
-
Check for correct mapping and modify if necessary.
-
Map to all of the required fields (indicated by an asterisk).
-
Click Next.
-
This displays Step 4: Check for Possible Duplicates.
-
Follow the instructions on this page.
-
Step 4 also provides the option of saving the current import file properties, mappings, and duplicate check indexes for future imports.
-
(Optionally) Save the import settings.
-
Click Import Now.
-
Click the Errors tab to check for errors in the process. Follow the instructions to fix problems (if any) and Click Import Again.
-
This displays Step 1 of the import process.
-
Follow all the steps in the wizard through Step 5.
-
If the import was successful, you can to view all the imported records at Step 5.
-
Click Undo Import if you are not satisfied with the imported records,
-
Or, click Import Again to import more data
-
Or, click Exit to navigate to the List View page of the module that you imported your records into.
Exporting Records
You can export SuiteCRM records in .csv format. When you exports records from the CRM, you will be provided with the .csv file to download when the export has finished executing. You can save and open this file in applications such as Libre Office Calc or Microsoft Office Excel.
The .csv file displays in a tabular format with columns and rows. When data is exported from the CRM, the record ID is included with all other fields that are specified in the export list for that module. You can then use the record ID as a reference for performing a 'Create new records and update existing records' import, as detailed in the Importing Records section of the user guide.
When exporting values from drop-down lists, SuiteCRM exports the ID associated with each option and not the display labels. For example, if a drop down list has options labelled High, Medium and Low with an ID of 1, 2 and 3 – the .csv file will show the drop down options as 1, 2 or 3.
Steps to Export Records
-
Select the records from the List View on the module’s home page.
-
Select Export from the Actions drop-down menu in the List View.
-
To export all records listed on the page, click Select located above the item list and select one of the following options:
-
This Page. To export all the records listed on the page, select this option.
-
All Records. To export all records on the list (if it is more than a page long), select this option.
-
This displays an Opening.csv dialog box.
-
Select Open to open the export file in .csv format or select Save to Disk to save the .csv file to your local machine.
-
Click OK to execute the operation. If you chose to open the file, the csv file opens in Microsoft Excel.
-
The file contains all the fields in the module from which you are exporting the data.
In-line Editing
In-line editing gives you the ability to change values “on the fly”. In-line editing has been implemented on both List View and Detail View, providing an advantage to users wishing to change field values quickly, reducing the number of clicks/processes that would normally be taken to edit the full record.
In-line editing can be enabled/disabled for both List View and Detail View. This can be done in the main System Settings for the CRM, by the System Administrator.

List View In-line Editing
You can edit record information on the List View of a module using in-line editing by clicking on a field where the pencil icon is shown.

You can either click on the pencil icon, or double click on the field to edit the value.

Once you have made the required change to the field value, you can either press Return or click on the 'tick'. This will save your changes. If you navigate away without making any changes, you will see a prompt warning you that you have made unsaved changes to the field being edited.

You can either click Cancel and continue editing and saving your change, or you can click OK which will discard the changes made.
Detail View In-line Editing
Similar to List View, you can edit record information on the Detail View of a module using in-line editing by clicking on a field where the pencil icon is shown.

You can either click on the pencil icon, or double click on the field to edit the value.

Once you have made the required change to the field value, you can either press Return or click on the 'tick'. This will save user changes. If you navigate away without making any changes, you will see a prompt warning you that you have made unsaved changes to the field being edited.

You can either click Cancel and continue editing and saving your change, or you can click OK which will discard the changes made.
Desktop Notifications
Enabling Desktop Notifications
You can enable desktop notifications by accessing the 'Advanced' tab within your user preferences. This will enable desktop notifications only for that browser on that computer. you can choose to enable the desktop notifications just for that browser session, or to always enable desktop notifications.
Users will have to enable desktop notifications on all browsers and computers if you use more than one.

Once desktop notifications have been enabled, users will receive notifications for any Calendar events such as:
-
Meetings – Meetings you have been invited to that have popup reminders set.
-
Calls – Calls you have been invited to that have popup reminders set.
Managing Desktop Notifications
If you have no notifications, the notification count will show '0' to tell you you currently have no notifications to check.

If you do not click on a desktop notification when it is displayed in the browser, for example you are AFK(Away From Keyboard) your notifications will be added to the notification list which shows as a count on the main navigation bar.

You can manage your desktop notifications by clicking the icon which will show any existing notifications.

You can either click the notification which will take you to the record the notification is related to or you can click the small 'x' icon to clear you immediately.
Summary
In this chapter, we covered all elements of the SuiteCRM user interface. There are many elements which you can use to optimise your navigation and data management, to increase productivity.
In the next chapter, we will look at modules. Modules are the data entities within SuiteCRM which can be standalone, or related to one or many other modules. Each module has a different function but many modules work together to structure and automate day to day business processes.